
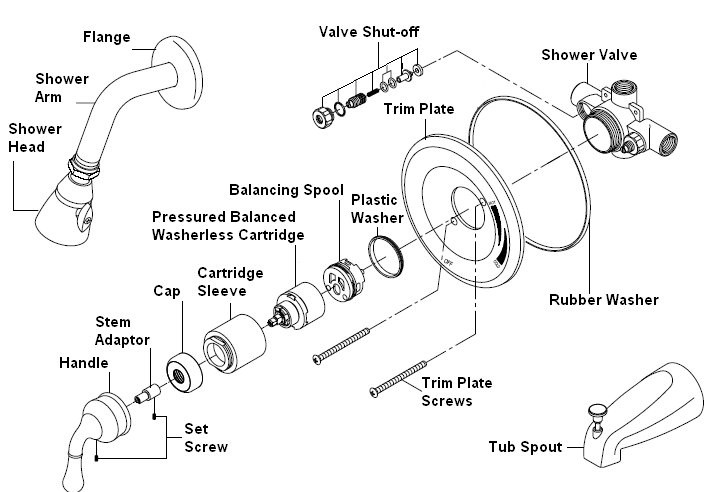
Please refer to the image below for parts.
- First, turn off the water supplies to the faucet.
- After you have successfully shut off your water supplies to the faucet you will need to open the hot and cold handle to release all water that may be left inline.
- Insert the Allen wrench provided into the handles set screw (which can be found just below the lever on the handle) and turn to the left. If you do not have a set screw on the handle then you will need to remove the handles cap located at the top of the handle to find the handle screw. Once the set screw/screw is loose you will be able to remove the handle by pulling towards you.
- Remove the handle and place it into a box so that the parts do not disappear. You will now see the stem or a stem adaptor, if there is a stem adaptor this will need to be removed by inserting your Allen wrench into the stem adaptors set screw and turn left until you feel that it is loose enough to remove and place into your box of parts.
- Now that your stem adaptor is removed and in your box, you will be able to remove the cartridge cap by hand by turning it to the left. Some lever handles do not have a cartridge cap so do not be alarmed or think that you are missing parts. After the cartridge cap is removed you will then need to remove the cartridge sleeve. To remove the cartridge sleeve, take an adjustable wrench or a pair of channel locks and fit it to the sleeve and proceed to turn left. Once you feel the sleeve loosen you can proceed to removing it by hand and placing it in your box.
- Now you should be looking at the pressure-balanced washerless cartridge. The cartridge can be removed with a pair of needle-nosed pliers. Fit the needle-nose pliers to the stem of the cartridge and gently wiggle it side to side while pulling it towards yourself.
- Now you have removed the faucets cartridge and are ready to install the new cartridge. Take your new cartridge and align the nipples located on the bottom of the cartridge with the indent slots located on the balancing spool. Please make sure that the blue gasket on the bottom of the cartridge is lubricated before installing. If you are unsure that you have installed the cartridge in its proper place you can gently rotate the cartridge until you fill it to lock it in place with the balancing spool.
- Take your cartridge sleeve out of your box and screw it back into place covering the cartridge. Make sure that you tighten this sleeve so that you can not remove it by hand(also keep in mind that you do not want to over-tighten the sleeve as this may cause further problems). Take your cartridge cap out of your box and screw it back onto the sleeve by hand.
- Grab your stem adaptor and insert it onto the stem of the cartridge and proceed to tighten the set screw with your Allen wrench. If you do not have a stem adaptor proceed to step 9. Pay attention to the direction in which you have installed the stem adaptor and make sure it matches the direction of your handle.
- Take your handle and place it back onto the stem adaptor or the cartridge stem. If you have a set screw for your handle take the Allen wrench and tighten the set screw until the handle feels secure in its place. If you have a Phillips head screw then you will place the handle back in position and proceed to screw the handle to the cartridge until it feels secure after you have done this you can take the handle cap and cover the handle screw.
Comments
0 comments
Please sign in to leave a comment.