
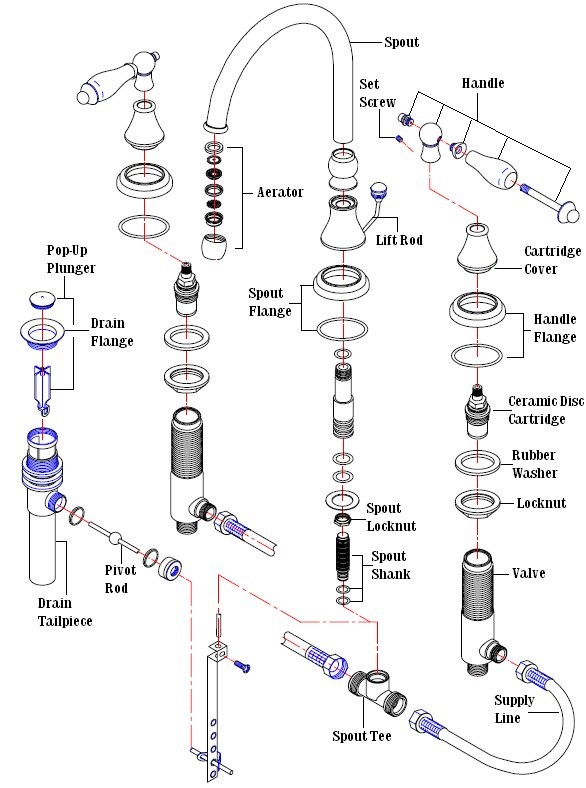
Please refer to the image below for parts.
1. First, turn off the water supplies to the faucet.
2. After you have successfully shut off your water supplies to the faucet you will need to open the hot and cold handle to release all water that may be left inline.
3. Insert the Allen wrench provided into the handles set screw (which can be found just below the lever on the handle) and turn counter-clockwise to loosen the handle.
**Please note that not all lever handles have a set screw some may have a hot or cold index button that will need to be removed in order to get to the handle screw.
Once the set screw/ screws are loose you will be able to remove the handle by pulling up. Be sure and hold onto the valve before fully removing the handle.
4. If your valve is still attached to the handle flange you will need to unthread it from the valve by turning counterclockwise and place it into your box. Not all widespread lavatory faucets have a handle flange that will thread onto the valve. Some widespread faucets handle flange will not thread onto the valve this is the reason you will need to hold onto the valve before fully removing the handle.
5. At this point, you should be holding the valve in your hand and the locknut and rubber washer should be in your box. You will need to fit your adjustable wrench to the hexagon piece on top of the ceramic disc cartridge, also take your channel locks or an additional adjustable wrench and remove the cartridge from the valve by turning counterclockwise.
**Please note that if the item has been used it may be a little difficult to remove the cartridge from the valve as calcium and debris may have built upon the threads over time.
6. Now take your new ceramic disc cartridge and thread it into the valve by hand, once it is hand tight take your adjustable wrench and tighten. Now your valve is complete and can be reconnected to your sink. Take your valve and rethread the locknut onto the valve along with the rubber washer.
7. Take your handle flange and screw it back onto the valve. If your handle flange does not have threads then you will be able to take your handle flange and cartridge cover and reinstall them above the valve above the counter. Now grab your handle out of your box and reinsert the cartridge stem into the handle. Grab your Allen wrench or screwdriver and screw your set screw or Phillips head screw back into the handle. Make sure that your handle is aligned to your liking before retightening your locknut.
8. After your handle is in its proper place, grab your adjustable and retighten your locknut. You’ll want to grab your channel locks or another adjustable wrench and hold the valve while retightening your locknut to hold the valve in place.
Comments
0 comments
Please sign in to leave a comment.